Dashboard: Routers
The Routers page gives you an overview of all routers and provides access to each router's configuration.
Routers List
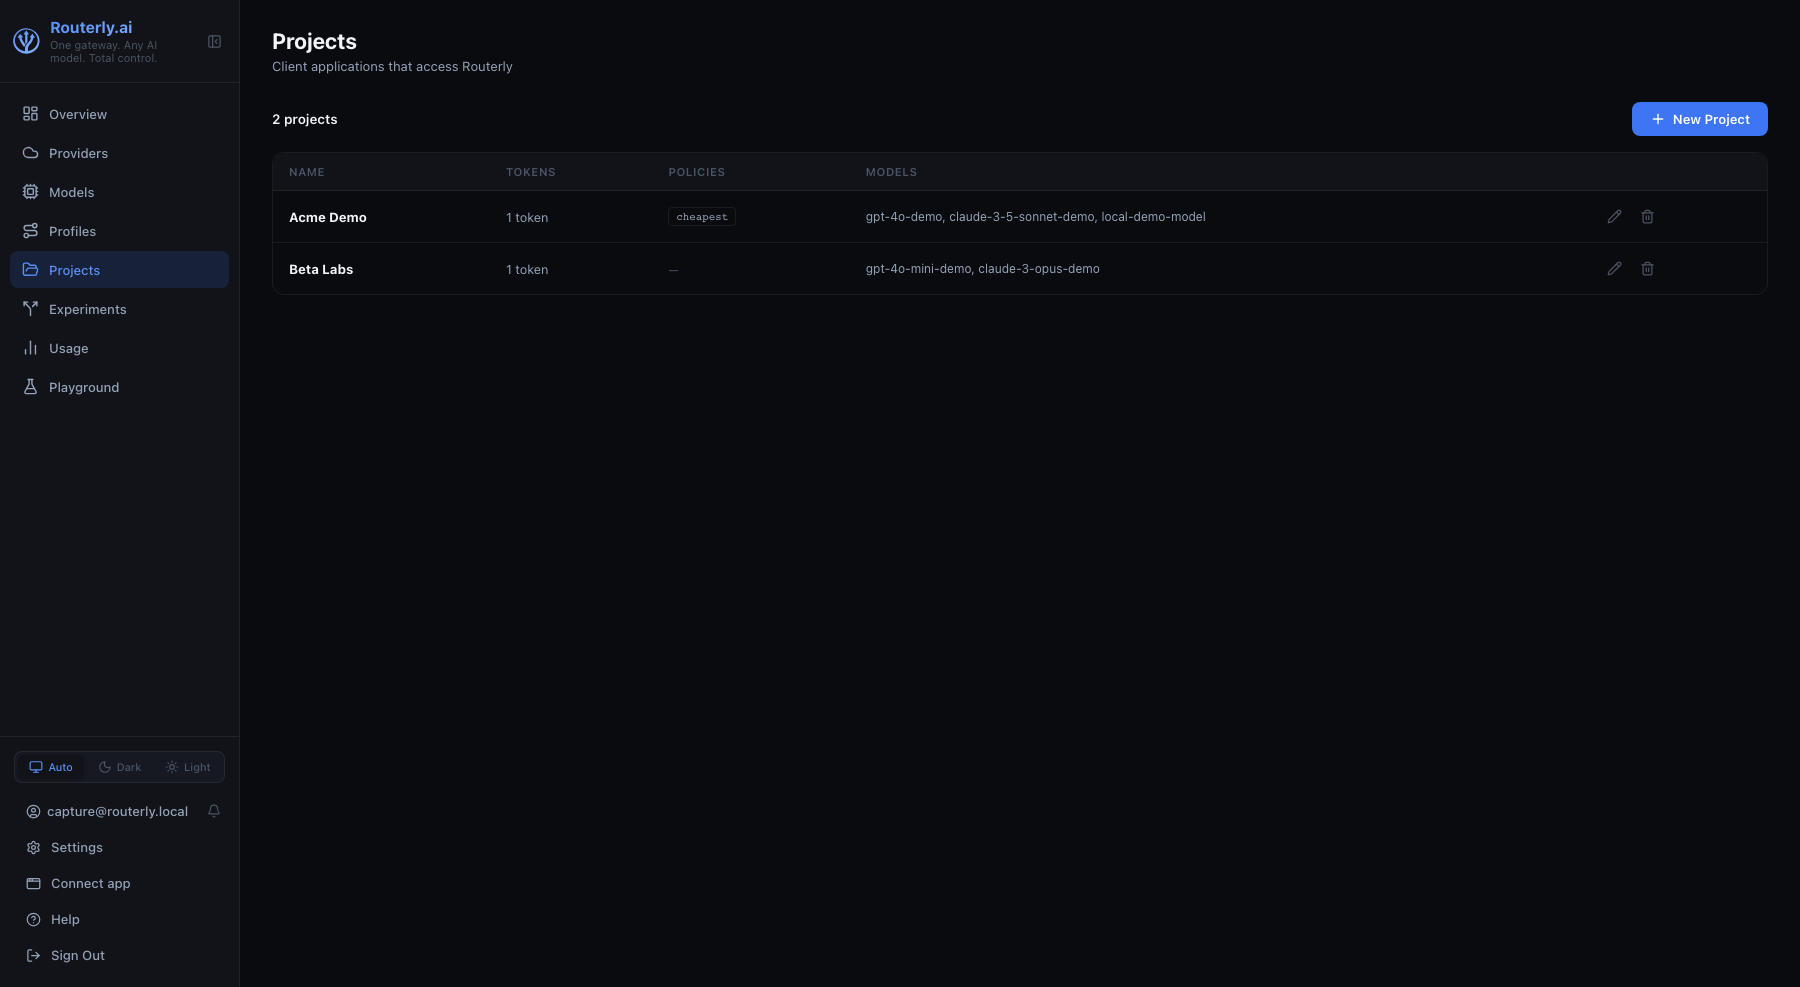
The list has four columns: name, number of tokens, active routing policies, and assigned target models.
Click any router to open its detail view, which has eight tabs.
Dashboard Tab
The landing page of a saved router: what the routing achieved over a period you pick with the date range selector at the top. A router that has never been called shows an empty state instead, and a router that has not been created yet has no Dashboard tab at all.
| Card | Reading |
|---|---|
| Savings | Money the routing avoided compared with sending every call to the router's most expensive target model |
| Cost | What the traffic actually cost, and how many calls it took |
| Latency | Median response time, with p95 underneath. Router and guardrail calls are excluded: they are gateway overhead, not client-visible time |
| Time to first token | Median TTFT with p95. Reads not measured on these calls when no record in the window carried a TTFT |
| Reliability | Share of successful calls, with error and blocked counts underneath |
Below the cards: input, output and prompt-cached token totals with the money the cache saved.
If everything had gone to one model is the counterfactual table, one row per enabled target model of the router. Costs are the observed tokens repriced at that model's rates, so they are exact arithmetic on what actually happened. Times are estimated from that model's own throughput in the same period, so a target with no traffic in the window shows no sample instead of a fabricated number.
What the optimizers removed appears once at least one optimizer changed a call in the period: one row per optimizer, with the calls it changed, the prompt tokens it removed, what those tokens would have cost, and how many of its results the safety gate rolled back. Unlike the counterfactual above it, these are measured on the calls as they were served, not repriced estimates. The section stays hidden when no optimizer ran, and on records written before 0.4.0, which never carry per-optimizer numbers. A high rollback count means that optimizer's threshold is set too aggressively for this router's traffic: tune it in the Optimizer tab.
Where the traffic went breaks the period down per model: calls, share of traffic, cost, p95 latency and errors.
The same figures are available headless with routerly report savings --router <id>.
A different model tokenizes the same text slightly differently and may answer at a different length. Read a row as "the same conversation, priced elsewhere", not as a guarantee.
General Tab
Shows and lets you edit:
- Name — display name for the router
- Slug — URL-safe identifier (read-only after creation)
- Timeout (TTFT) — how long a model attempt may take to produce its first token, in milliseconds. Defaults to
2000;0waits as long as the provider takes - Trace content — off by default. Traces always record metadata (models, scores, guardrail outcomes, tokens, cost, latency); turn Capture prompts and answers on to also record the message contents. They are stored with the usage record, shown in the Usage trace view and the Playground, included in exported traces, and visible to anyone who can read reports. CLI equivalent:
routerly router edit <router> --trace-content - Notification channels — optional per-router override: tick external notification channels (webhook, email, native…) that also receive this router's events, in addition to the channels matching globally. Shown only to users with the
notification:writepermission. CLI equivalent:routerly router edit <router> --notification-channel <channel> - Connection Info — base URL and masked token snippet ready to copy into your SDK configuration
- Budget — router-level cost limit (daily / monthly)
Routing Tab
Configure which models this router can use and how to select between them.
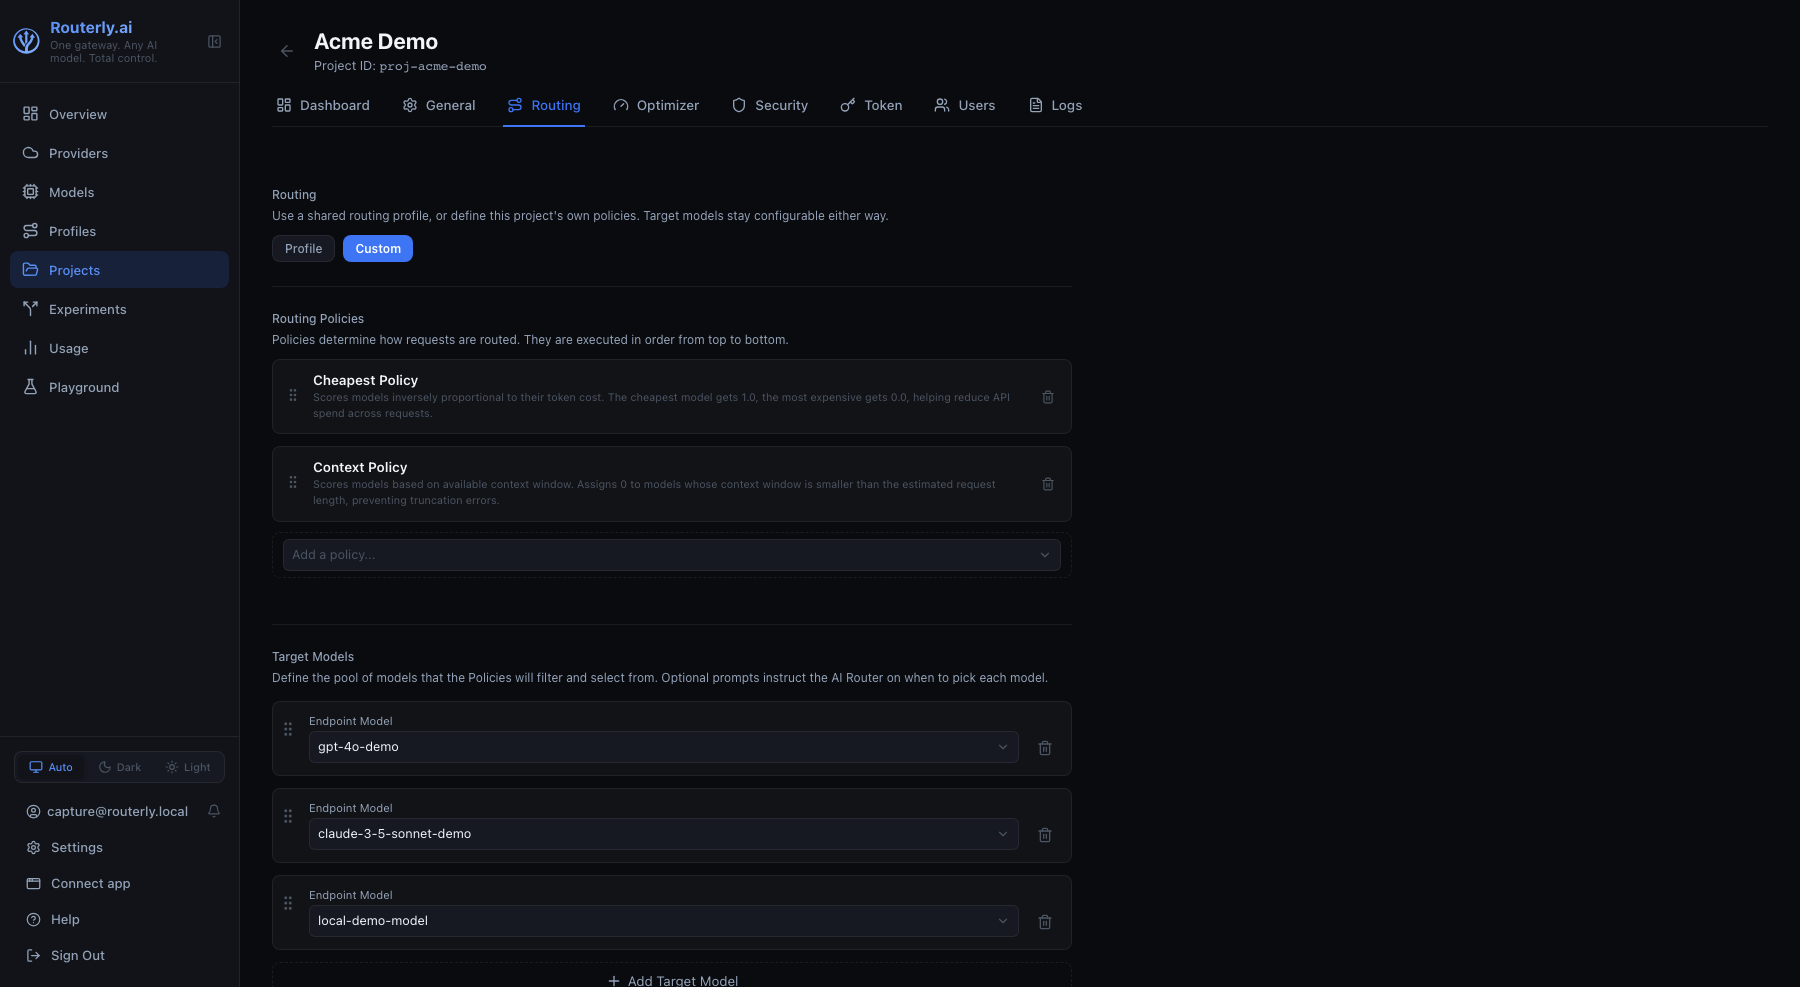
Routing Profile
At the top of the tab, a Profile / Custom switch decides where this router's routing comes from. Target models stay configurable in both modes.
Profile assigns a shared routing profile. A dropdown
lists the built-in profiles first (labelled (built-in)), then any custom
ones; selecting one saves immediately, independently from the Save
Routing Configuration button below. The inline policy editor is hidden:
policies, selector and fallback strategy all come from the profile and follow
its later edits, which are made on the Profiles page.
Choosing a profile or switching between Profile and Custom never changes what is stored: a notice shows the pending change and nothing is persisted until Save Routing Configuration is clicked (Discard drops it). Custom always shows this router's own stored policies, unchanged. To start them from a profile, use Copy into custom; when custom policies already exist it asks for confirmation before replacing them, and the copy is still unsaved until you save.
Adding Models
Use the + Add Model button to pick from registered models. Models appear in a numbered list — their order determines the default routing priority (position 0 is highest).
Drag and drop to reorder.
Passthrough routers always show one additional, fixed row labelled Pass-through (raw forward) — it forwards the client's own credential to the provider unmodified, is created automatically with the router and cannot be removed (its delete button is disabled). It can be dragged to any position alongside the router's real target models, same as any other row. Where it sits decides the router's default behaviour: dragging it to the top (position 0) makes raw-forward the default outcome for every request, and real models are never scored regardless of how many are configured; anywhere else, real models are scored and routed normally and the pass-through entry is used only as a last-resort fallback when none of them are eligible. See Concepts: Architecture for the full rule, including the fallback's forwarded-credential caveat.
Adding Policies
Drag policies from the policy panel on the right into the active-policies list on the left. Each policy can be expanded to configure its parameters.
Available policies: cheapest, health, performance, capability, context, llm, rate-limit, fairness, budget-remaining.
See Concepts: Routing for each policy's behaviour and parameters.
Optimizer Tab
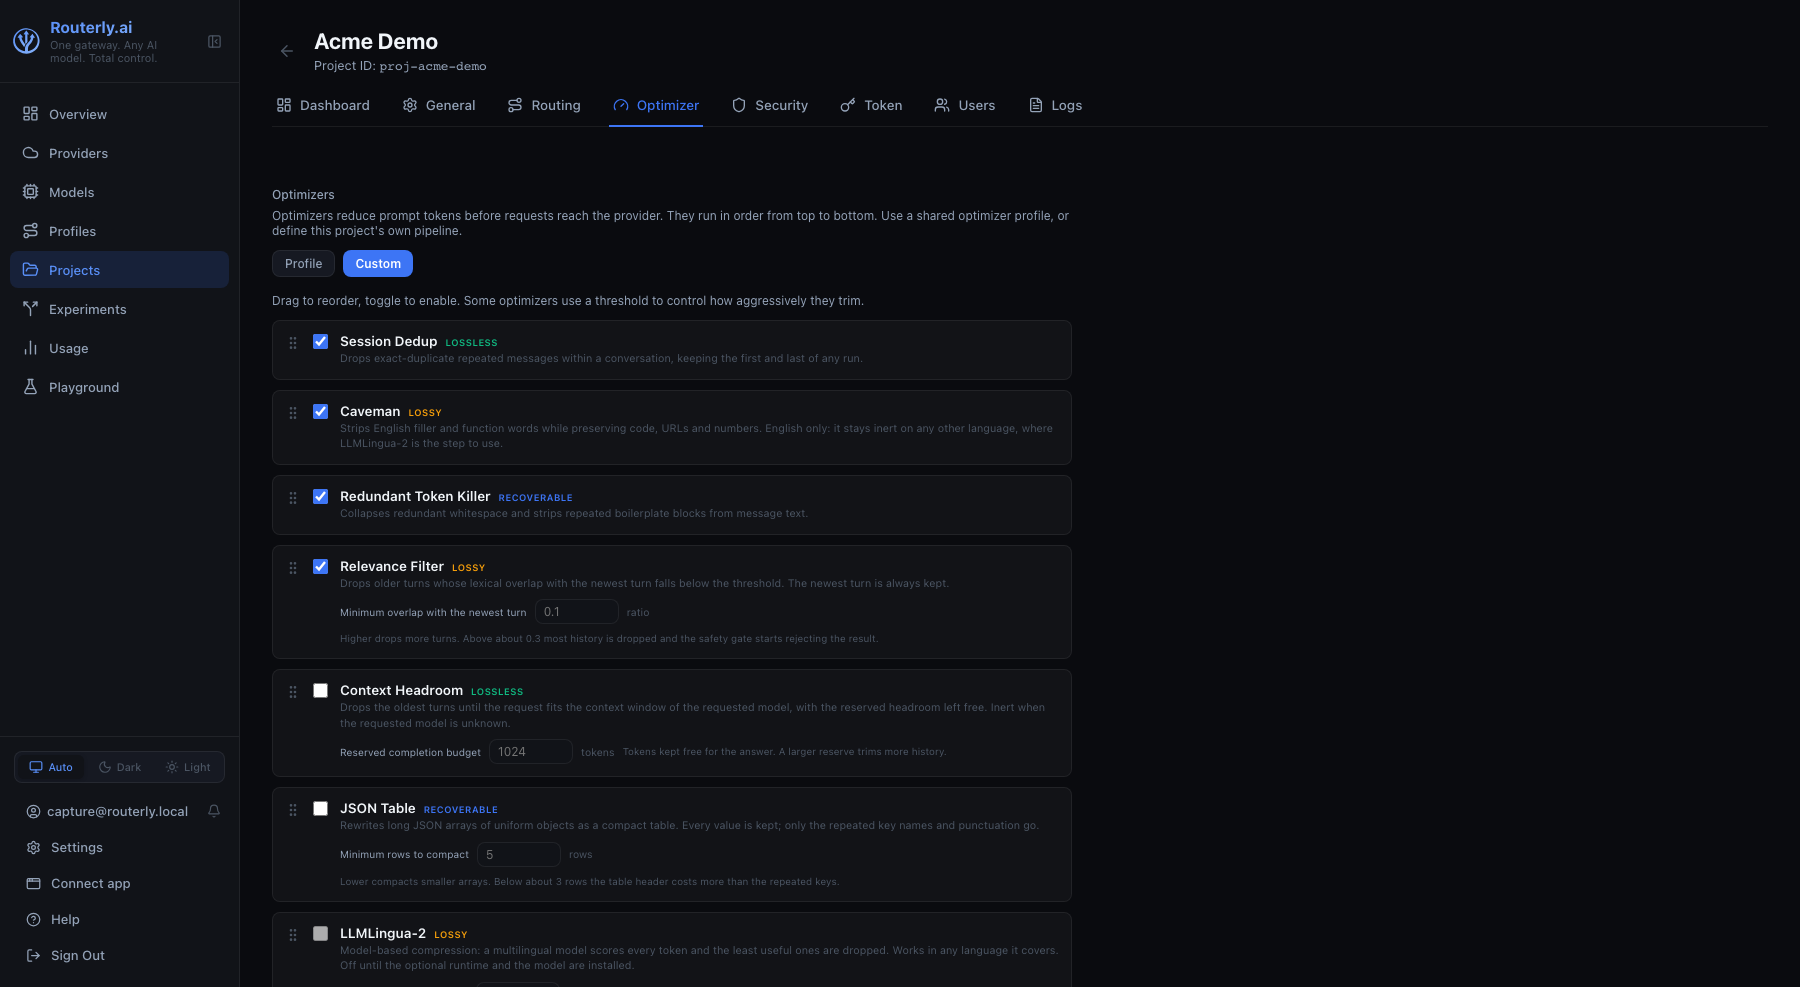
Configure this router's prompt/context optimizer pipeline: a per-router, ordered list of optimizers that reduce a request's token footprint before it is forwarded to a provider.
Required permission: optimizers:read to view the tab; optimizers:manage to toggle, reorder, edit thresholds, or save.
Optimizer Profile
A Profile / Custom switch at the top of the tab decides where the pipeline comes from, exactly like the Routing tab. In Profile mode a dropdown assigns a shared optimizer profile; the pipeline editor is replaced by a read-only list of the profile's enabled steps. The choice is a pending change (shown in a notice, with Discard) and is applied only on Save Optimizers. Custom always shows the router's own stored steps; Copy into custom fills the editor from a profile after a confirmation when steps already exist.
The switch is only shown with optimizers:manage.
Optimizer Rows
All 8 installed optimizers are listed, one per row, in pipeline execution order:
- Checkbox: enable/disable this optimizer for the router
- Name and description: the optimizer's display name, its class
(
Lossless./Recoverable./Lossy.), and a one-line summary of its behavior - Threshold: shown only on the optimizers that take one, labelled with
what it actually controls (
Recent turns to keepforccr,Reserved completion budgetforheadroom,Minimum rows to compactforjson-table,Minimum overlap with the newest turnforrelevance,Fraction of tokens to keepforllmlingua-2). The field carries the accepted range, its unit next to the input, and a line saying which way to move it. Left empty it uses the built-in default, shown as the input's placeholder.session-dedup,rtkandcavemanhave no threshold field at all - Drag handle: drag rows to reorder; the pipeline runs top to bottom
Rows for optimizers not yet configured on the router appear disabled at the
end of the list; enabling one and saving adds it to optimizers.steps.
See Concepts: Optimizers for what each optimizer does, its class, and which steps are language-bound, including the Threshold Range each optimizer's threshold accepts.
The LLMLingua-2 Row
llmlingua-2 runs on a downloaded model, so its row carries the download
rather than a separate box elsewhere on the page. It appears only on that
row, and only once the row is in the pipeline.
Its checkbox stays disabled until at least one checkpoint is downloaded: the step is skipped on every request without one, so enabling it would do nothing. An already-enabled step stays toggleable, so a pipeline can always be turned off.
Under the description, one line per checkpoint: its name, size, licence note and a Download button. What each line can show:
| State | What it looks like |
|---|---|
| Not downloaded | A Download button |
| Downloading | A progress bar with the percentage and, when the host reports sizes, 42% (76 of 182 MB). It polls every 3 seconds, so a page opened or refreshed mid-download picks the progress straight up |
| Downloaded | Downloaded, and the checkpoint becomes selectable |
| Failed | The host's error message and a Retry button |
The checkpoints live on the service host and are shared: every router that
picks one uses the same download. Which one this router's step runs on is
the LLMLingua-2 checkpoint dropdown below the list, offered once at least
one is downloaded; leaving it on Default checkpoint uses the one the host
marks default. Picking a checkpoint that is not downloaded warns that the
step will be skipped on every request until it is.
When the optional @huggingface/transformers dependency is missing on the
host, the row says so instead of offering a download: there is nothing to run
a checkpoint with. See Concepts: Optimizers,
llmlingua-2 for the install.
Downloading needs optimizers:manage; with optimizers:read alone the
buttons are disabled and the states are still visible.
Saving
Click Save Optimizers to persist the enabled/disabled state, order, and
thresholds. A row that is disabled and has no threshold set is not
persisted to optimizers.steps. Only enabled rows, or disabled rows with a
threshold, are written.
Preview Panel
Below the pipeline editor, Preview token savings dry-runs the pipeline
the router uses against one prompt: in Profile mode the assigned profile's
steps, in Custom mode the current (unsaved) steps of the editor. The preview
follows the mode and profile shown on screen, including a choice you have not saved yet. The result
names the pipeline it ran, and is cleared when you switch mode or profile. No upstream call is
made and nothing is saved. It matches POST /api/optimizers/preview (see
API: Optimizers).
The Prompt dropdown chooses what to run it against:
- Type a prompt below (the default) keeps the free-text box, where you paste a sample user message
- Any other entry is one of the sample conversations shipped with Routerly. Picking one replaces the text box with that conversation, read-only, above a line saying which steps it exercises
Running a fixture is the point of the picker: a hand-typed sentence rarely
resembles the long, repetitive conversations optimizers work on, so it
under-reports what a pipeline would do in production. Each fixture is built
to trigger a different group of steps, and long-context-en is the one for
headroom, previewed against a model whose window is 32k or smaller.
Routerly does not record real prompts, so these conversations are the only
preview material (see Concepts: Optimizers,
Privacy).
The Model dropdown addresses the sample to a model, listing this router's models (or every configured model when the router allows all of them) with each one's context window on the label. Steps that trim to fit a window need to know which window: on No model they are skipped, exactly as they would be on a request naming a model Routerly has no window for.
Click Run Preview for tokens before, tokens after, tokens saved, and a per-step breakdown. Clicking anywhere on a step row expands it to a word-level diff of what that step changed: removed words struck through in red, added words in green, compared against the previous step's output so the diff reads as a chain. A step whose result the safety gate rejected is labelled rolled back: the change was rejected as unsafe rather than shown as a no-op, and a step that declined to run reads skipped: followed by its own reason (no context window for the model, no repeated message, text that is not English, no JSON array long enough, the checkpoint not downloaded). Both tell a zero saving apart from a threshold set too aggressively.
Tokens Tab
Manage Bearer tokens for this router.
Creating a Token
- Click + New Token
- Enter a Name (e.g.
production,staging,ci) - Optionally add Scopes: free-form scopes (e.g.
batch,internal) stored with the token for your own bookkeeping. Routerly does not interpret them. The MCP server uses personal MCP tokens, not these scopes. - Optionally add Tags — key-value metadata (e.g.,
environment: production,team: backend). Tags are included in every usage record created with this token, enabling filtering and analysis by custom dimensions. - Optionally configure per-token limits (metric, limit value, window type, mode)
- Click Create
The token value (sk-rt-…) is shown once. Copy it immediately.
Per-Token Limits
Per-token limits let you cap spending for individual applications sharing the same router. The mode field controls how the per-token limit interacts with the router-level limit:
| Mode | Behaviour |
|---|---|
replace | Per-token limit overrides the router limit for this token |
extend | Both per-token and router limits must pass |
disable | No budget check for this token |
Rolling or Regenerating a Token
Click the Re-generate icon to invalidate the current token and issue a new one. The previous token stops working immediately.
Editing a Token
Click a token's Name to open the edit view. Here you can:
- Update Scopes: add or remove access scopes without touching the token value itself.
- Update Tags — add, remove, or modify key-value metadata. Changes apply immediately to all future usage records created with this token.
- Modify Limits — add or remove spending limits without touching the token value itself.
Any changes to scopes, tags, or limits take effect immediately and do not invalidate the token.
Users Tab
Assign dashboard users to this router. A user assigned here can see and manage the router based on their role's permissions.
Available roles: viewer, editor, admin (or any custom role defined in Users & Roles).
Clicking a member row puts it in edit mode, the same the Edit icon does; a row already being edited keeps the click for its inputs. Removing a member stays on its own button.
Notification Routing
A router has no notifications tab. The scope lives on the channel: open Settings → Notifications, edit a channel, and pick the routers it covers in its Routers field. An empty field means every router.
Events are recorded in the in-app inbox regardless of channel scope, so narrowing a channel never hides an event from the Inbox.
Logs Tab
A live log of recent requests routed through this router.
| Column | Description |
|---|---|
| Timestamp | When the request arrived |
| Model | Provider model that handled the request |
| Status | success (green), blocked (amber), error / budget_exceeded etc. (red) |
| Input Tokens | Number of input tokens |
| Output Tokens | Number of output tokens generated |
| Cost | Estimated USD cost |
A blocked status means a guardrail rule rejected the request before it reached any model. Zero tokens and zero cost are recorded.
Click any row to open the Trace view which shows the full routing decision: which policies ran, which models were considered, and why the final model was chosen.
The table auto-refreshes at a configurable interval. Use the interval selector (5 s / 15 s / 30 s / 1 min / 5 min / Off) to control polling.
Security Tab
Configure request filtering and data protection for this router.
Required permission: router:update
Security Profile
A Profile / Custom switch at the top of the tab decides where the guardrails and PII policies come from, exactly like the Routing tab. In Profile mode a dropdown assigns a shared security profile; the editors below are replaced by a read-only list of the profile's rules and PII policies. The choice is a pending change (shown in a notice, with Discard) applied only on save. Custom always shows the router's own stored rules; Copy into custom fills the editors from a profile after a confirmation when custom rules already exist.
Content Guardrails
Enable guardrails to evaluate requests and/or responses against an ordered list of independent rules. Each enabled rule is evaluated in sequence.
Injection Warning
When one or more rules have the Inject flag enabled, an amber warning banner appears above the rule list:
"One or more rules inject their instruction into the outgoing request's system prompt. The request payload is modified. No extra judge call is made, and nothing is blocked."
This is a soft steering feature (no block, no judge call) and is fully transparent.
Rule Cards
Each rule card displays:
- Type: rule category (regex, semantic, topic, moderation)
- Enabled toggle: when off, this rule is skipped during evaluation
- Scope flags (topic/moderation only): three independent checkboxes:
- Request: judge the user messages before they reach the model (hard block + log on trigger)
- Inject: append this rule's instruction to the request system prompt so the model self-enforces (soft steer, no block). For topic rules, injects the allowed-topics description; for moderation, injects the custom instructions (or a built-in default).
- Response: judge the model's response before it reaches the client (hard block + log on trigger)
- At least one flag must be enabled. Inject-only rules (no Request or Response) skip the judge entirely.
- Scope options (regex/semantic only): Request, Response, or Both (no Inject option)
- Judge configuration fields (topic/moderation only; visible when Request and/or Response is checked):
- Judge Model: dropdown of available judge models (filtered to exclude embedding-only models)
- Fallback Models (optional): multi-select of fallback judge models tried in order if the primary is unavailable or errors
- Harm/Topic Threshold: slider (0-1, default 0.5). For moderation, triggers when score > threshold. For topic, triggers when score < threshold (off-topic).
- Type-specific configuration fields:
| Type | Config |
|---|---|
| Regex | Regex patterns (one per line, case-insensitive) |
| Semantic | Embedding model ID, optional fallback embedding models (multi-select, tried in order), example phrases to block, similarity threshold (0-1, default 0.82) |
| Topic | Allowed-topics description, score threshold (0-1, default 0.5) |
| Moderation | Custom instructions (required): the policy, written in plain words (for example "Do not talk about English cinema"). The judge rates how strongly the text violates it (0 = complies, 1 = clear violation) and the rule triggers above the threshold (0-1, default 0.5). When inject is on, the same text is added to the system prompt. Without custom instructions the built-in harm categories apply. |
Judge response (reason-first scoring)
For topic and moderation rules with a judge (Request and/or Response enabled), the judge is asked to respond with a reason first, then a fine-grained score from 0.00 to 10.00. The reason (in the user's language) becomes the block message when the rule triggers. The score is normalized to 0-1 before the threshold check. This anchored rubric prevents bimodal score collapse on small models.
Model selection
The model dropdowns are filtered by type:
- Topic and Moderation judges: show only non-embedding models (chat/completion models). Embedding-only models cannot act as LLM judges and are excluded.
- Semantic embedding field: shows only models with
capabilities.embedding = true.
Fallback models
For topic, moderation, and semantic rules, the "Fallback models (optional, tried in order)" multi-select field allows selecting zero or more fallback models that will be tried in order if the primary model is unavailable or returns an error. If the primary model returns a budget-exceeded error, fallbacks are not tried (fail-closed on budget).
Streaming Interaction Notice
When a rule has the Response flag enabled (and thus requires buffering the response before the judge verdict), streaming is automatically disabled for the request, and the client receives the full response as a single chunk.
A clear notice box appears on the form when this condition is detected:
"Responses will be buffered (no streaming) because one or more rules judge the response."
Consumer impact
When a judged rule has its Request or Response flag enabled and triggers, the request or response is rejected before reaching the model (or before being sent to the client). Routerly returns HTTP 200 with a wire-faithful content-filter response: finish_reason: "content_filter" (OpenAI) or stop_reason: "refusal" (Anthropic), with empty content. The block message (from the judge's reason field) is stored on the trace but does not appear in the wire response. API consumers that check finish_reason/stop_reason will detect the block; those that only read message content will receive an empty reply.
When a rule has only the Inject flag enabled (soft steering), the rule steers the model without calling the judge and does not block or log. The request is forwarded with no consumer-visible impact.
When a rule is skipped (disabled, unavailable model, judge error), the request is forwarded with no consumer-visible impact. The skipped rule is recorded on the usage record for audit purposes.
PII Scrubbing
Enable PII scrubbing to automatically detect and replace sensitive data in requests before they reach the model, and optionally in responses before they are returned to the caller.
PII configuration uses a list of policies. Click + Add policy to create a new policy. Each policy is displayed as "Policy 1", "Policy 2", etc. (1-based numbering). Each policy has:
- Enabled toggle: when off, this policy is skipped
- Target: request, response, or both (which side(s) to scrub)
- Entity types: checkboxes for EMAIL, PHONE, CREDIT_CARD, SSN, IBAN. All types are selected by default. Uncheck any type to exclude it from scrubbing.
- Custom patterns: optional regex patterns in addition to entity detection
- Streaming buffer size: (response scrubbing only) suffix buffer size in characters (10-500, default 30). Used to catch patterns spanning chunk boundaries when streaming. Only appears when Target includes response.
All enabled policies with the same direction (request/response) are merged at scrub time. When multiple response policies are active, the largest buffer size is used.
Matched values are replaced with typed placeholders:
| Entity Type | Placeholder | Notes |
|---|---|---|
EMAIL | [EMAIL] | Email addresses |
PHONE | [PHONE_NUMBER] | Phone numbers (US and international formats) |
CREDIT_CARD | [CREDIT_CARD] | Card numbers (PAN) |
SSN | [SSN] | US Social Security Numbers |
IBAN | [IBAN] | International Bank Account Numbers |
Consumer impact
PII scrubbing modifies message content before it reaches the model and/or before responses are returned to the caller. Original sensitive values are replaced with typed placeholders. The model receives and responds based on the modified version and cannot reference the original values.
API consumers calling this router's endpoint should be aware that their messages will be modified in-flight. If your application logic requires the model to see exact credit card numbers, email addresses, or phone numbers, disable scrubbing for those entity types. The usage record will include a piiRedacted field listing which entity types were detected and scrubbed.
Saving Security Settings
Click Save Security Settings at the bottom of the tab. The button displays a green checkmark on successful save.